Jedi Language Server Configuration
The details below describe how to install and configure the Jedi Python language server found
here.
IMPORTANT: The installation process uses pip, so the first step is to make sure pip has been updated as per the instructions found
here.
Installation
Use the Zeus
Tools, Command Shell menu to open a command prompt and run the following command:
pip install -U jedi-language-server
If that command results in the following error refer to the important note mentioned above.
'pip' is not recognized as an internal or external command,
operable program or batch file.
To test the installation run the following command:
jedi-language-server.exe --version
That command should result output similar to the following:
0.46.0
Zeus IDE Jedi Script Change
Zeus uses Jedi for autocomplete, and for this reason make sure the following script change has been made to one of the Zeus Jedi files.
Open the file found here:
AppData\Local\Programs\Zeus (x64)\zScript\Python\Lib\jedi\inference\imports.py
Find the following line of code at the top of that file:
# NOTE: This is needed for Zeus Jedi autocomplete
import zeus
Make sure that code is wrapped in a try catch as shown below:
try:
    # NOTE: This is needed for Zeus Jedi autocomplete
    import zeus
except ModuleNotFoundError:
    # ignore any loading errors
    pass
Zeus IDE Configuration
Use the Zeus
Options, Document Types menu to edit the Python document type and in the
Language Server panel apply the following configuration settings:
Program Type: Executable
     Program: jedi-language-server.exe
   Directory:
   Arguments:
Using the Language Server
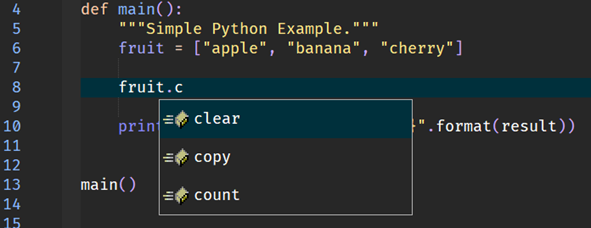
To test the configuration create a simple test.py file and fire off an autocomplete request:
In addition to code completion, code navigation, function signatures and document hover will also work.
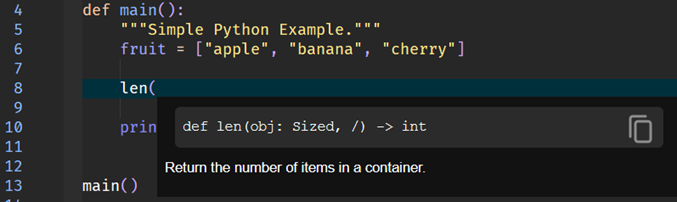
Shown below is an example of the function signatures autocomplete feature.
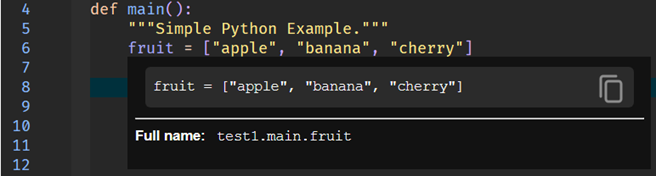
Shown below is an example of the document hover feature.